A shed is a fantastic space for storing tools, gardening supplies, and seasonal items, but without proper organization, it can quickly become a cluttered mess. The key to unlocking your shed’s full potential is vertical storage.
While you can buy pre-made shelving units, they often don’t fit the space perfectly or provide the strength needed for heavy items. Learning how to build shelves in shed spaces yourself allows you to create a custom solution that is sturdy, space-efficient, and surprisingly affordable.
This guide is designed for beginners and will walk you through a simple, effective method for building strong, wall-mounted shelves using basic tools and materials, transforming your shed from a chaotic pile into an organized haven.
Shelves are an essential part of maximizing storage and keeping your tools, supplies, and other items organized in a shed. Whether you’re storing gardening equipment, seasonal decorations, or hardware, having a dedicated place for everything not only saves time but also extends the life of your belongings by keeping them off the floor and out of harm’s way.
By building your own shelves, you’ll have the flexibility to design a system that suits your specific needs, while also enjoying the satisfaction of a DIY project made with your own hands.
Why Custom Shelves Are a Game-Changer
Building your own shelves offers significant advantages over store-bought options. You have complete control over the design, allowing you to customize the height, depth, and length of each shelf to perfectly fit your specific tools and containers. This means no wasted space.
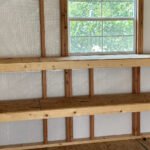
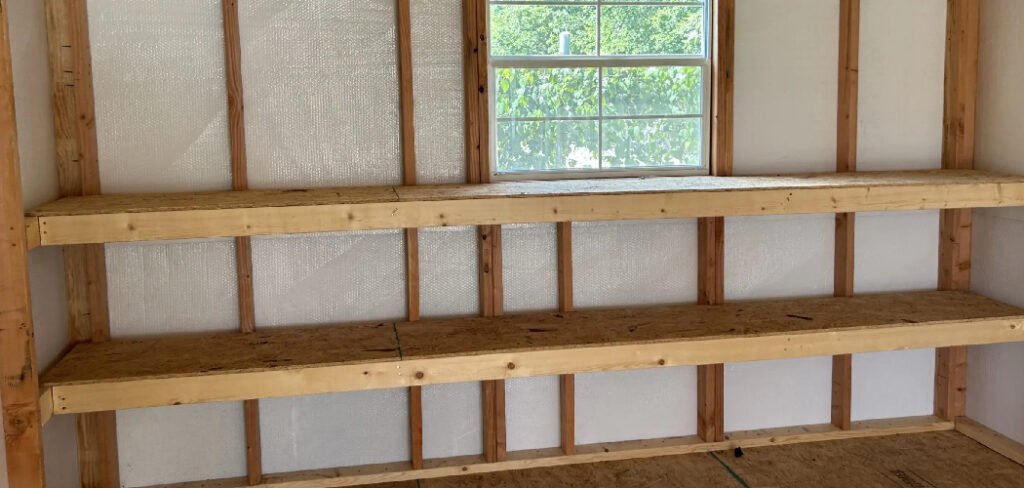
You can build around windows, fit shelves into awkward corners, and decide exactly how much clearance you need for tall items like weed whackers or short items like paint cans.
Furthermore, by building directly onto the shed’s wall studs, you create an incredibly strong and durable storage system that can handle far more weight than a flimsy freestanding plastic or metal unit, giving you peace of mind that your heavy equipment is secure.
A Step-by-Step Guide on How to Build Shelves in Shed
Step 1: Design and Plan Your Shelving Layout
Before you buy any materials, you need a solid plan. Decide which wall or walls you want to use for shelving. Think about what you need to store and measure those items to determine the ideal shelf depth and the vertical spacing you will need between shelves.
For example, large storage totes might require 20 inches of clearance, while smaller toolboxes may only need 12 inches. Use a tape measure and a pencil to mark the desired height of each shelf directly on the wall. This planning phase ensures you buy the right amount of lumber and build a system that truly meets your storage needs.
Step 2: Locate and Mark the Wall Studs
The strength of your shelves comes from attaching them directly to the shed’s internal frame. The vertical wooden beams inside your shed walls are called studs, and you must anchor your shelf supports to them. Use a stud finder to locate the center of each stud along the wall where you plan to build.
Mark the stud locations with a pencil at the height you planned for each shelf support. Most shed studs are spaced 16 or 24 inches apart on center. If you don’t have a stud finder, you can often locate them by tapping on the wall and listening for a solid thud instead of a hollow sound.
Step 3: Cut the Horizontal Shelf Supports
The shelf supports, or cleats, are the 2x4s that will be mounted horizontally to the wall studs and will hold up the shelf surface. Using your plan from Step 1, measure and cut one 2×4 cleat for the back wall for each shelf you intend to build. For example, if you want an 8-foot-long shelf, you will cut an 8-foot-long 2×4.
Use a circular saw or miter saw for clean, straight cuts. It is also a good idea to cut the shorter side supports at this time. If you want your shelves to be 16 inches deep, you will need to cut two 14.5-inch-long pieces of 2×4 for each shelf (16 inches minus the 1.5-inch thickness of the back cleat).
Step 4: Attach the Back Support Cleats to the Wall
With your back supports cut, it is time to mount them. Position the first 2×4 cleat on the wall, aligning it with the pencil marks you made for your lowest shelf. Use a level to ensure it is perfectly horizontal; crooked shelves are not only an eyesore but also less stable.
Once level, drive 3-inch-long wood screws through the cleat and directly into the center of each wall stud you marked earlier. Use at least two screws per stud for a secure hold. Repeat this process for each of the back support cleats, working your way up the wall.
Step 5: Install the Side Support Brackets
Now you will create the full support frame for each shelf. Take the shorter 2×4 pieces you cut in Step 3 and attach them to the ends of the horizontal back cleat, forming an L-shape that extends out from the wall. Drive screws through the side of the shorter piece and into the end grain of the long back cleat.

You can also add a few screws at an angle (toe-screwing) for extra strength. If your shed has studs on the side walls, you can also screw these side supports directly into them for an incredibly robust frame. This is a key moment in learning how to build shelves in shed walls for maximum strength.
Step 6: Cut the Plywood or OSB for the Shelf Surface
The final component is the actual shelf surface. This is typically made from 3/4-inch plywood or Oriented Strand Board (OSB), as both offer excellent strength and are relatively inexpensive. Measure the top dimensions of the support frames you just built.
Your plywood width should match the depth of your side supports (e.g., 16 inches), and the length should match the length of your back cleat (e.g., 8 feet). Use a circular saw and a straightedge guide to make these cuts. It is often easiest to have the home improvement store make these large cuts for you if you don’t have the space or tools.
Step 7: Secure the Shelf Surface to the Supports
The last construction step is to place the cut plywood or OSB sheets on top of the 2×4 support frames. The wood should sit flush against the back wall and be fully supported by the cleats underneath. To prevent the shelf from shifting or wobbling, secure it to the supports using 1.25-inch wood screws.

Drive screws down through the plywood and into the 2×4 cleats every 12 to 16 inches along the back and sides. This final step locks the entire structure together, creating a strong, stable, and unified shelving unit ready to be loaded up.
Frequently Asked Question (Faq)
What Is the Best Wood for Building Shed Shelves?
For the support structure, standard 2×4 lumber is the best choice due to its strength, availability, and low cost. For the shelf surface, 3/4-inch plywood or Oriented Strand Board (OSB) are excellent options.
Plywood offers a smoother surface, while OSB is often slightly cheaper. Both can easily support heavy loads when properly supported by the 2×4 frame. Avoid using thinner materials like 1/2-inch plywood, as it can sag over time.
How Deep Should My Shed Shelves Be?
The ideal depth depends on what you plan to store. A depth of 16 inches is a great all-purpose size, as it is deep enough to hold most storage totes, toolboxes, and paint cans without being so deep that items get lost in the back.
For storing smaller items like jars of screws or spray cans, a shallower shelf of 8 to 12 inches might be more efficient. Measure your largest storage containers before you start building.
How Much Weight Can 2×4 Shelves Hold?
When built correctly by anchoring 2×4 supports into wall studs, these shelves are incredibly strong. A properly constructed shelf can typically hold 50 pounds or more per linear foot.
The key factors are the quality of your screws, the integrity of the wall studs, and the span between supports. For very long shelves or extremely heavy loads, you can add vertical 2×4 supports in the middle of the shelf for added strength.
Do I Need to Paint or Seal My Shed Shelves?
While not strictly necessary, applying a coat of paint or sealer is a good idea. Sheds can be damp environments, and a layer of paint or polyurethane will protect the wood from moisture, preventing it from warping or growing mildew.
It also makes the shelves easier to clean and gives your shed a more finished, organized appearance. A simple coat of exterior-grade latex paint works perfectly.
Can I Build Freestanding Shelves Instead of Wall-Mounted?
Yes, you can absolutely build freestanding shelving units if you prefer not to screw into your shed walls or if you have a metal shed with no internal studs.
The construction is similar, but you will build a complete box-like frame with four vertical “legs” made from 2x4s. This allows you to move the unit around, but it may not be as sturdy or space-efficient as shelves built directly into the wall structure.
Conclusion
Building your own shed shelves is a transformative weekend project that pays dividends for years to come. By creating a custom storage solution, you reclaim valuable floor space and bring order to the chaos, making it easier to find the tools and supplies you need.
The process is straightforward, requiring only basic carpentry skills and a well-thought-out plan. You control the dimensions, the strength, and the final cost, resulting in a system far superior to any off-the-shelf alternative.
Now that you have a clear guide on how to build shelves in shed, you are ready to tackle this project and finally create the organized, functional workspace you have always wanted.
About
Jovie Mathews is a backyard and outdoor expert writer with over 12 years of hands-on experience transforming neglected outdoor spaces into thriving gardens and functional retreats. Raised in a family where weekends meant digging in the soil and building raised beds from scratch, Jovie developed a genuine love for the outdoors long before it became a career.
She writes with a practical, no-fluff approach — always testing ideas in her own backyard before sharing them with readers. From composting systems and native plant selection to patio design and pest control, Jovie covers the full spectrum of backyard life with equal parts expertise and enthusiasm.
Education
B.Sc. in Horticulture Science
University of Florida (UF) · Gainesville, FL · 2014
IFAS College of Agricultural and Life Sciences
Minor in Environmental Studies
University of Florida (UF) · Gainesville, FL · 2014
College of Liberal Arts and Sciences
Areas of expertise
- Lawn & Garden Care
- Soil prep, planting, seasonal care
- Outdoor DIY Projects
- Raised beds, fencing, pathways
- Composting & Soil Health
- Organic methods, amendments
- Native Plants & Wildlife
- Pollinators, habitat gardening
When she is not writing, Jovie can be found testing new composting techniques, growing tomatoes in questionable quantities, or convincing her neighbors that clover lawns are actually a great idea. She currently gardens in the Pacific Northwest.