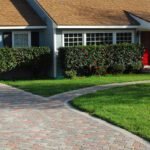
A beautiful paver patio, walkway, or driveway can dramatically enhance your home’s curb appeal. Over time, however, these surfaces accumulate dirt, grime, moss, and weeds, making them look dull and neglected. A pressure washer is a powerful tool that can restore their original beauty, but using it correctly is key.
Improper technique can not only damage the pavers but also blast away the joint sand that keeps them stable. This guide is designed for beginners and will provide a safe, effective method for how to pressure wash pavers, ensuring a clean finish without causing costly damage. We’ll cover everything from preparation to the final, crucial step of reapplying sand.
Why Proper Technique Is Essential
Using a pressure washer seems simple, but there’s a fine line between cleaning and destroying your paver surface. Pavers are set on a bed of sand and held in place by sand in the joints.
Using too much pressure or aiming the wand directly down can easily dislodge this essential joint sand, leading to wobbly, unstable pavers that can shift and settle over time.
Furthermore, an aggressive stream can etch the surface of the pavers themselves, causing permanent damage known as “wand marks.” Learning the correct technique—using the right nozzle, angle, and distance—ensures you remove only the grime, leaving the pavers and their foundational structure intact for years to come.
Step-by-Step Guide on How to Pressure Wash Pavers
Step 1: Clear the Area and Protect Surroundings
Before you even start the pressure washer, you need to prepare the workspace. Remove all furniture, potted plants, grills, and any other items from the paver surface. Use a stiff-bristled broom or a leaf blower to sweep away loose debris like leaves, twigs, and surface dirt.
\This initial sweep prevents you from just blowing this mess around with the pressure washer. Take a moment to cover nearby doors, windows, and delicate plants with plastic sheeting. The spray from a pressure washer can travel surprisingly far, and a little protection now will save you from cleaning your windows later.
Step 2: Select the Right Pressure and Nozzle
Choosing the correct equipment settings is critical for a safe and effective wash. For most residential paver cleaning, a pressure washer with a rating between 1,500 and 2,000 PSI is ideal. Anything stronger risks damaging the pavers. The nozzle you choose is just as important.
Never use the red zero-degree nozzle, as its pinpoint stream will etch concrete and blast out joint sand instantly. Instead, start with a wide-angle nozzle, like the white 40-degree or the green 25-degree tip. These fan-shaped sprays provide enough power to clean without being overly aggressive, giving you better control over the cleaning process.
Step 3: Pre-Treat Stains and Weeds
For the best results, it is wise to address stubborn stains and vegetation before you begin washing. Apply a biodegradable, paver-safe degreaser to any oil or grease spots, allowing it to sit for the time recommended by the manufacturer.

For weeds and moss growing in the joints, you can spray them with a vinegar solution or a commercial weed killer a day or two beforehand. This pre-treatment helps to break down tough grime and kill the roots of the weeds, making them much easier to remove with the gentle pressure of the water stream later on.
Step 4: A Beginner’s Guide on How to Pressure Wash Pavers
With your area prepped, it’s time to start washing. Begin at the highest point of your patio or walkway and work your way down, allowing the dirty water to drain away naturally.
Hold the pressure washer wand at a 30 to 45-degree angle to the surface and maintain a consistent distance of at least 12 inches between the nozzle tip and the pavers.
Use a smooth, sweeping motion, overlapping each pass slightly to avoid creating lines or streaks. Never aim the spray directly down into the paver joints; the goal is to sweep the dirt off the surface, not to excavate the sand between them.
Step 5: Wash in Sections and Rinse Thoroughly
Do not try to clean the entire patio at once. Instead, mentally divide the area into small, manageable sections, about four feet by four feet. Concentrate on cleaning one section completely before moving to the next. This methodical approach ensures you achieve a uniform clean across the entire surface.
As you finish each section, use the pressure washer from a greater distance to give the area a final rinse, pushing all the dislodged dirt and grime away from the cleaned pavers and off the patio. Rinsing thoroughly is key to preventing dirty water from settling and drying on your newly cleaned surface.
Step 6: Let the Pavers Dry Completely
Patience is a virtue after the washing is complete. You must allow the pavers and the joints between them to dry completely before proceeding to the final step. This drying process can take anywhere from 24 to 48 hours, depending on the temperature, humidity, and sun exposure.
Walking on the pavers while they are still saturated with water can cause them to shift, especially since some of the joint sand has been displaced. A thoroughly dry surface is essential for the new jointing sand to flow properly into the gaps and set correctly.
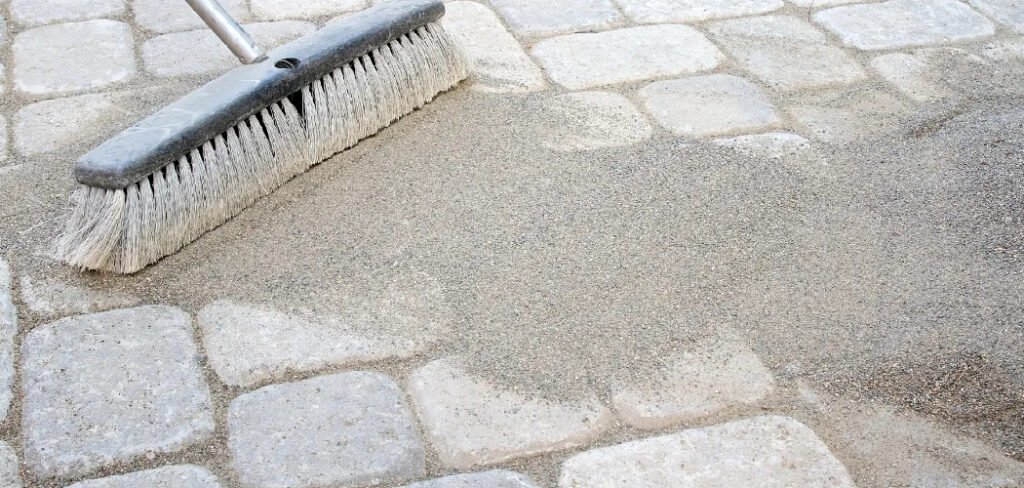
Step 7: Re-sand the Paver Joints
This is the most important step for maintaining the integrity of your paver installation. Once the surface is bone dry, spread polymeric sand over the pavers. Use a push broom to sweep the sand across the surface, allowing it to fall into and completely fill the joints.

Polymeric sand contains polymers that, when activated with water, create a firm yet flexible bond that locks the pavers in place and inhibits weed growth. Make sure every joint is filled to just below the edge of the pavers. This final part of how to pressure wash pavers correctly ensures their long-term stability.
Step 8: Compact the Sand and Activate It
After filling the joints, use a leaf blower on a low setting to blow the excess sand off the paver surfaces. Any sand left on top will harden into a hazy film. Then, use a hand tamper or a plate compactor to gently vibrate the pavers, which helps the sand settle deep into the joints.
Sweep more sand in if needed. Finally, set your hose nozzle to a very light “mist” or “shower” setting. Gently mist the entire area to activate the polymers in the sand. Avoid flooding the area with a strong stream. The sand will harden over the next 24 hours, locking your clean pavers securely in place.
Frequently Asked Questions (FAQ)
What PSI Is Safe for Washing Pavers?
For most residential pavers, a pressure setting between 1,500 and 2,000 PSI is considered safe and effective. It’s strong enough to remove dirt and organic growth without etching the surface of the paver.
It’s always best to start with a lower pressure and a wider nozzle, then increase slightly only if necessary for stubborn stains.
Should I Use Soap or Chemicals to Wash Pavers?
For general cleaning, plain water is often sufficient. However, for tough oil stains or heavy mildew, a biodegradable, paver-safe cleaner or degreaser can be very helpful.
- Always pre-treat stains according to the product’s directions.
- Avoid using harsh chemicals like bleach, which can discolor pavers and harm surrounding plants.
How Often Should I Pressure Wash My Pavers?
This depends on your climate and how much foot traffic the area gets. Generally, pressure washing your pavers once every one to two years is enough to keep them looking clean and well-maintained. Areas in shady, damp environments may require more frequent cleaning to combat moss and algae growth.
What Is Polymeric Sand and Why Is It Important?
Polymeric sand is a fine sand mixed with polymer additives. When activated with water, it hardens to lock pavers together firmly.
It is crucial to re-sand your paver joints with polymeric sand after pressure washing because the process inevitably displaces some of the original sand. This step prevents pavers from shifting, inhibits weed growth, and deters ants.
Can I Damage My Pavers with a Pressure Washer?
Yes, absolutely. Using a pressure washer incorrectly is a common way to damage pavers. The primary risks are:
- Using a zero-degree (red) nozzle, which can etch the surface.
- Holding the nozzle too close to the paver, causing wand marks.
- Aiming the spray directly into the joints, which washes out the stabilizing sand.
Always use a wide-angle nozzle and maintain a safe distance.
Conclusion
Restoring the look of your paver surfaces is a highly satisfying DIY project that instantly boosts your home’s curb appeal. The key to success is not brute force, but a methodical and careful approach.
By preparing the area, using the correct pressure and nozzle, and working at a safe angle, you can effectively remove years of built-up grime without causing harm. The most critical takeaway is the final step: always replenish the joints with polymeric sand to lock your pavers in place and ensure their stability.
Now that you know how to pressure wash pavers correctly, you can tackle this project with confidence and enjoy a beautiful, like-new patio for years to come.
About
Jovie Mathews is a backyard and outdoor expert writer with over 12 years of hands-on experience transforming neglected outdoor spaces into thriving gardens and functional retreats. Raised in a family where weekends meant digging in the soil and building raised beds from scratch, Jovie developed a genuine love for the outdoors long before it became a career.
She writes with a practical, no-fluff approach — always testing ideas in her own backyard before sharing them with readers. From composting systems and native plant selection to patio design and pest control, Jovie covers the full spectrum of backyard life with equal parts expertise and enthusiasm.
Education
B.Sc. in Horticulture Science
University of Florida (UF) · Gainesville, FL · 2014
IFAS College of Agricultural and Life Sciences
Minor in Environmental Studies
University of Florida (UF) · Gainesville, FL · 2014
College of Liberal Arts and Sciences
Areas of expertise
- Lawn & Garden Care
- Soil prep, planting, seasonal care
- Outdoor DIY Projects
- Raised beds, fencing, pathways
- Composting & Soil Health
- Organic methods, amendments
- Native Plants & Wildlife
- Pollinators, habitat gardening
When she is not writing, Jovie can be found testing new composting techniques, growing tomatoes in questionable quantities, or convincing her neighbors that clover lawns are actually a great idea. She currently gardens in the Pacific Northwest.