Providing your flock with nutritious treats is a fantastic way to supplement their diet and keep them happy. Chickens absolutely love insects, and mealworms are a protein-packed favorite. Instead of constantly buying dried mealworms, you can easily and affordably grow your own. This guide will walk you through the simple process of how to raise mealworms for chickens, creating a sustainable and healthy food source right in your own home. It’s a rewarding project for any chicken keeper, regardless of experience, and your flock will thank you for the fresh, wiggly snacks.
Why Raise Your Own Mealworms for Chickens?
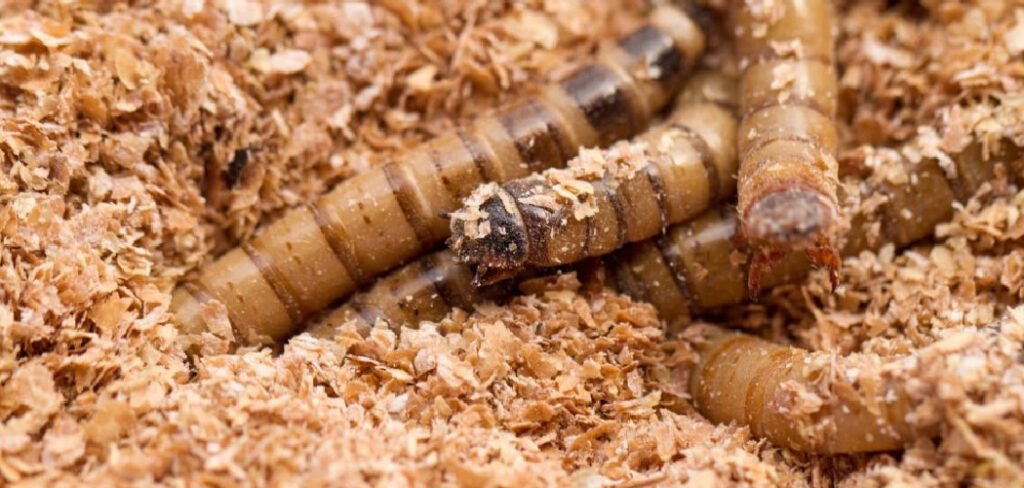
Raising your own mealworms is a smart move for any chicken owner. It provides a consistent, cost-effective supply of high-protein treats that are far superior to the dried ones from the store. Live mealworms offer better nutritional value, containing more moisture and essential nutrients that support healthy egg production and feather growth. This sustainable practice also reduces your reliance on commercial products and gives you complete control over what your chickens eat. By creating your own mealworm farm, you are not just feeding your flock; you are investing in their health and well-being while embracing a more self-sufficient approach to homesteading.
8 Step-by-Step Guide on How to Raise Mealworms for Chickens
Step 1: Gather Your Supplies
Before you begin, you will need to gather a few essential items. Start with a shallow plastic or glass container, such as a set of plastic drawers or a fish tank. You will need a substrate to serve as both bedding and food for the mealworms; wheat bran, rolled oats, or chicken mash work perfectly. A source of moisture is also critical. Slices of raw potato, carrot, or apple are excellent choices. Finally, you will need your starter colony of mealworms, which you can purchase online or from a local pet supply store. Having everything ready will make the setup process smooth and efficient.
Step 2: Set Up the Container
Properly preparing the container is key to a successful mealworm farm. Fill your chosen container with about two to three inches of your substrate, such as wheat bran or rolled oats. This layer provides the mealworms with their primary food source and a place to burrow and live. Spread the substrate evenly across the bottom. Ensure the container has smooth sides to prevent the mealworms and beetles from escaping. While a lid is useful for keeping out dust and other pests, make sure it has plenty of ventilation holes to allow for adequate air circulation and prevent mold growth.
Step 3: Add Your Mealworms and Moisture Source
Once your container is prepared, it is time to introduce your starter colony of mealworms. Gently add them to the bin, spreading them out over the substrate. They will quickly start to burrow down into their new home. Next, add a source of moisture. Place a few thick slices of carrot, potato, or apple on top of the substrate. This is how the mealworms will get their water. Avoid spraying water directly into the bin, as this can create humidity issues and lead to mold, which is harmful to the colony. Replace these vegetable slices every few days as they dry out or get eaten.
Step 4: Maintain the Ideal Environment
Mealworms thrive in a specific environment, and maintaining it is crucial for their growth and reproduction. Keep the container in a dark, warm location, as they prefer temperatures between 75-80°F (24-27°C). A closet, a dark corner of a garage, or a spot near a gentle heat source works well. Lower temperatures will slow down their life cycle, while excessively high temperatures can be fatal. Check on your colony every few days to remove dried-out vegetable slices and add fresh ones. Maintaining this stable and comfortable environment encourages the mealworms to progress through their life cycle efficiently.
Step 5: Understand the Mealworm Life Cycle
To successfully raise mealworms, it is helpful to understand their four-stage life cycle. It begins with the egg, which hatches into a larva—this is the mealworm stage. The mealworm will eat and grow, shedding its skin multiple times. After several weeks, it will transform into a pupa. The pupa is a white, stationary creature that does not eat or move much. This stage lasts for one to three weeks before it emerges as a darkling beetle. These beetles are the reproductive engine of your farm; they will mate and lay hundreds of tiny eggs in the substrate, starting the cycle all over again.
Step 6: Separate the Pupae
As your mealworms mature, you will start to see white, C-shaped pupae appear in the bin. It is a good practice to separate these pupae from the main colony. Mealworms and beetles can sometimes nibble on the defenseless pupae, so moving them to a separate, dedicated container ensures a higher survival rate. You can gently pick them out with your fingers or a small spoon and place them in a new container with a thin layer of the same substrate. This bin does not need a food or moisture source, as the pupae do not eat.
Step 7: Manage the Darkling Beetles
After a few weeks, the pupae will hatch into darkling beetles. These beetles should be kept in their own container to mate and lay eggs. This container should be set up just like your original mealworm bin, with a few inches of substrate and a moisture source like carrots or potatoes. The beetles will live for a few months, laying hundreds of eggs in the substrate. This beetle bin will become the source of your next generation of mealworms. After about a month, you can move the beetles to a fresh bin to allow the eggs in the first one to hatch undisturbed.
Step 8: How to Harvest Your Mealworms for Chickens
Once your farm is established and producing a steady supply, you can begin harvesting. The best time to harvest is during the larva (mealworm) stage. Use a sifter to separate the mealworms from the substrate. You can then feed the live, wriggling mealworms directly to your excited chickens. It is important to leave a significant portion of the mealworms in the bin to continue their life cycle into pupae and beetles, ensuring your colony remains sustainable. Regular, moderate harvesting will keep your flock happy without depleting your farm. This is the most rewarding part of learning how to raise mealworms for chickens.
Keep the Colony Clean
Maintaining a clean environment is vital for a healthy mealworm farm. Over time, the substrate will break down into a fine, sand-like powder known as frass, which is the mealworms’ waste. You will also find shed exoskeletons. Periodically, you will need to sift the frass and debris from the usable substrate. Frass makes an excellent, nutrient-rich fertilizer for your garden, so do not throw it away. Adding fresh substrate as needed ensures your mealworms have plenty of food. A clean bin prevents odors and reduces the risk of mold or mites, keeping your colony productive.
Frequently Asked Questions
What Do Mealworms Eat?
Mealworms primarily eat their bedding, which is why using a nutritious substrate is so important. Good options include:
- Wheat bran
- Rolled oats
- Chicken mash
- Cornmeal
They get their hydration from slices of fresh vegetables or fruits, such as carrots, potatoes, or apples. Avoid watery vegetables like cucumber, as they can introduce too much moisture and cause mold.
How Long Does It Take to Raise Mealworms?
The entire life cycle from egg to beetle typically takes about three to four months, depending on temperature and food availability. The egg stage lasts 1–2 weeks, the larval (mealworm) stage lasts around 10 weeks, the pupal stage is 1–3 weeks, and the beetle lives for a few months. You can start a small harvest a couple of months after starting your farm, but it will become more productive as the colony grows.
Do Mealworm Farms Smell Bad?
A properly maintained mealworm farm should not have a strong or unpleasant odor. It typically has a mild, nutty, or earthy scent from the substrate. Bad smells usually indicate a problem, such as too much moisture leading to mold, or a buildup of dead mealworms or beetles. Regularly removing old vegetable pieces and keeping the bin clean and well-ventilated will prevent any foul odors from developing.
Can I Feed My Chickens the Pupae and Beetles?
Yes, chickens can eat all stages of the darkling beetle life cycle. They will happily eat the pupae and the adult beetles. However, the beetles have a harder exoskeleton and a distinct smell that some chickens might not prefer. For breeding purposes, it is best to save most of your pupae and beetles to sustain your colony. Feeding the excess or older beetles to your flock is a great way to ensure nothing goes to waste.
How Many Mealworms Should I Feed My Chickens?
Mealworms should be given as a treat, not as a primary food source. They are high in protein but do not offer balanced nutrition on their own. A good rule of thumb is to offer about 10–15 mealworms per chicken a few times per week. During molting season, you can increase this amount slightly to provide extra protein for feather regrowth. Always provide them in addition to a complete and balanced layer feed.
Conclusion
Creating your own thriving mealworm farm is an achievable and highly beneficial project for any chicken keeper. By following these simple steps, you can establish a self-sustaining source of fresh, protein-rich treats that will improve your flock’s health and happiness. The process is low-cost, requires minimal space, and gives you complete oversight of your chickens’ diet. Now that you understand the fundamentals, you are well-equipped to master how to raise mealworms for chickens and enjoy the rewarding experience of providing the best for your feathered friends.

About
Jovie Mathews is a backyard and outdoor expert writer with over 12 years of hands-on experience transforming neglected outdoor spaces into thriving gardens and functional retreats. Raised in a family where weekends meant digging in the soil and building raised beds from scratch, Jovie developed a genuine love for the outdoors long before it became a career.
She writes with a practical, no-fluff approach — always testing ideas in her own backyard before sharing them with readers. From composting systems and native plant selection to patio design and pest control, Jovie covers the full spectrum of backyard life with equal parts expertise and enthusiasm.
Education
B.Sc. in Horticulture Science
University of Florida (UF) · Gainesville, FL · 2014
IFAS College of Agricultural and Life Sciences
Minor in Environmental Studies
University of Florida (UF) · Gainesville, FL · 2014
College of Liberal Arts and Sciences
Areas of expertise
- Lawn & Garden Care
- Soil prep, planting, seasonal care
- Outdoor DIY Projects
- Raised beds, fencing, pathways
- Composting & Soil Health
- Organic methods, amendments
- Native Plants & Wildlife
- Pollinators, habitat gardening
When she is not writing, Jovie can be found testing new composting techniques, growing tomatoes in questionable quantities, or convincing her neighbors that clover lawns are actually a great idea. She currently gardens in the Pacific Northwest.