Ensuring that your home is accessible to everyone, regardless of mobility challenges, is a vital part of creating a welcoming and safe environment. Whether you are accommodating a family member who uses a wheelchair, recovering from surgery, or simply planning for the future, a sturdy ramp can make all the difference. While the project might seem daunting due to safety codes and structural requirements, it is entirely manageable with careful planning and the right tools.
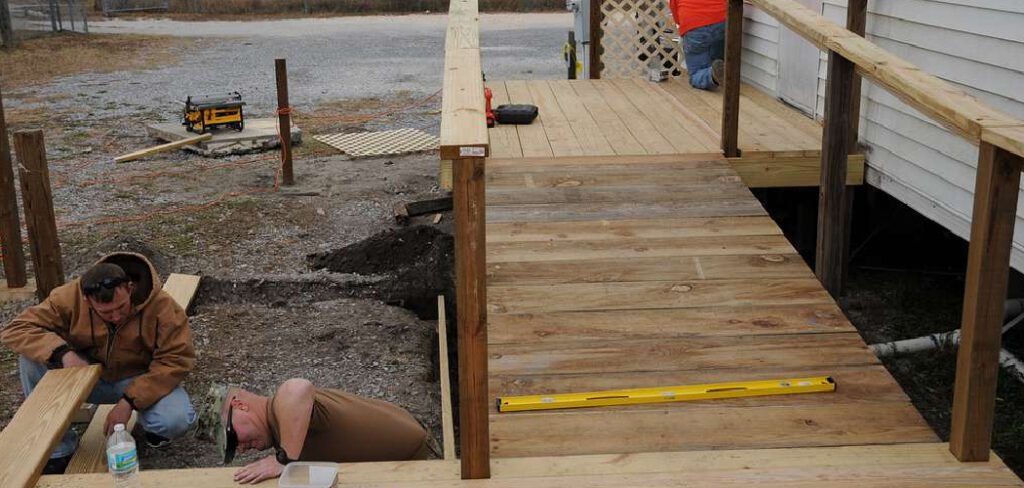
By following a structured approach, you can construct a durable, safe, and code-compliant structure that blends seamlessly with your home’s exterior. This guide is designed to empower DIY enthusiasts with the knowledge needed to tackle this project confidently. We will walk you through exactly how to build a handicap ramp for a porch, covering everything from the initial measurements to the final non-slip finish, ensuring you create a reliable pathway for years to come.
Building a handicap ramp for a porch is a project that combines practicality with thoughtful design. Whether you’re accommodating mobility needs for a loved one or enhancing accessibility for your home, this project requires careful planning and a clear understanding of the steps involved. By focusing on safety, functionality, and aesthetics, you can create a ramp that not only serves its purpose but also complements the overall look of your home.
Why Build a Handicap Ramp?
Accessibility is a fundamental aspect of creating an inclusive and welcoming environment for everyone. A handicap ramp allows individuals with mobility challenges, including those using wheelchairs, walkers, or strollers, to safely and easily enter and exit your home. It provides greater independence and convenience for loved ones while improving the home’s functionality and value. Additionally, constructing a ramp demonstrates foresight, as it prepares your home for potential future needs, ensuring it remains accessible and adaptable over time.
8 Step-by-Step Guide on How to Build a Handicap Ramp for a Porch
Step 1: Correct Slope and Length
The most critical aspect of your project is determining the correct slope, as a ramp that is too steep is dangerous and unusable. The Americans with Disabilities Act (ADA) recommends a ratio of 1:12, meaning for every one inch of vertical rise, you need one foot of ramp length. Start by measuring the vertical distance from the ground to the top of your porch landing.
If your porch is 24 inches high, you will need 24 feet of ramp. Failing to adhere to this ratio can result in a structure that is physically impossible for a wheelchair user to climb safely. Planning this length helps you visualize the footprint in your yard and decide if you need a switchback or L-shaped design to fit the space properly.
Step 2: Acquire Permits and Gather Materials
Before you dig a single post hole, you must check with your local building department regarding permits and zoning laws. Building codes for ramps are strict to ensure user safety, often dictating handrail height, width, and landing dimensions. Once your plan is approved, purchase high-quality materials. Pressure-treated lumber is the standard choice for outdoor structures because it resists rot and insect damage effectively.
You will need 4×4 posts for vertical support, 2×6 or 2×8 boards for the framing joists, and 5/4 decking boards for the surface. Don’t forget galvanized bolts, screws, and concrete for setting the posts. Having all materials on-site prevents delays and ensures a smooth construction process for your accessibility project.
Step 3: Layout and Install the Footings
With your permit in hand and materials ready, begin by marking the layout of the ramp on the ground using batter boards and mason’s line. This visual guide ensures your structure will be square and level. Dig post holes at the intervals specified in your plan, usually every four to six feet apart to provide adequate support.
The depth of these holes depends on your local frost line; they must be deep enough to prevent heaving during winter freezes. Place concrete forms in the holes, insert your 4×4 posts, and fill them with concrete. Ensure each post is perfectly plumb (vertical) before the concrete sets, as these will bear the entire weight of the structure and its users.
Step 4: Framing the Essential Structure
Once the concrete has cured and the posts are solid, you can begin attaching the framing. This involves installing the stringers or joists that will support the decking. Establish the correct slope by marking the height on each post, ensuring you maintain that crucial 1:12 ratio.
Attach the side joists (usually 2x8s) to the posts using heavy-duty galvanized carriage bolts. The transition from the ramp to the porch must be flush to prevent a tripping hazard. You may need to use metal joist hangers for additional strength. This skeletal structure is the backbone of your project, so double-check your levels and measurements constantly to ensure a smooth, even decline.
Step 5: Install the Decking Surface
With the frame secure, you can now lay down the decking boards. Run the boards perpendicular to the direction of travel, which provides better traction for wheelchair wheels and foot traffic compared to running them lengthwise. Leave a small gap, approximately 1/8 inch, between each board to allow rainwater to drain through and to account for wood expansion during humid weather.
Fasten the decking with high-quality exterior deck screws, sinking the heads slightly below the surface to prevent snags. If your design includes landings for turning or resting, ensure these flat sections are level and spacious enough (usually at least 5×5 feet) to allow a wheelchair to turn around comfortably without hitting the railings.
Step 6: Construct Safe and Sturdy Handrails
Safety railings are non-negotiable for any ramp with a rise greater than six inches. Most codes require handrails on both sides of the ramp, typically positioned between 34 and 38 inches above the ramp surface. Secure vertical balusters to the side joists or the main support posts, ensuring they are spaced no more than four inches apart to prevent children or pets from slipping through.
Top these with a smooth, graspable handrail. The rail must be continuous and extend slightly beyond the top and bottom of the ramp to offer support as the user transitions on and off the slope. Sand down any rough edges or splinters, as users will be relying on these rails for stability and balance.
Step 7: Adding a Non-Slip Finish for Safety
A wooden ramp can become incredibly slippery when wet, turning your accessibility feature into a hazard. To prevent accidents, you must apply a non-slip finish. You can use a dedicated non-slip deck paint that contains aggregate grit, or you can mix a specialized additive (like silica sand) into a high-quality exterior stain or sealer.
Another effective method regarding how to build a handicap ramp for a porch involves attaching adhesive non-slip strips or gritty grip tape specifically designed for outdoor use. Apply this texture across the entire width of the walking surface. This final touch ensures that wheels can grip the wood and feet won’t slide, providing peace of mind during rain or snow.
Step 8: Install Protective Toe Guards
The final structural safety measure is the installation of toe guards or curbing. These are low rails, typically lumber attached directly to the deck surface along the bottom edge of the railings. Their purpose is to create a barrier that prevents a wheelchair, walker, or cane from slipping off the edge of the ramp.
A simple 2×4 installed on edge along the perimeter is usually sufficient. This small addition keeps the wheels contained within the safe path of travel. Once these are installed, do a final walkthrough, checking for loose screws, rough spots, or instability. Your ramp is now complete and ready to provide safe, reliable access to your home.
Frequently Asked Questions (FAQ)
What Is the Maximum Slope for a Handicap Ramp?
The Americans with Disabilities Act (ADA) standard for residential ramps is a 1:12 slope. This means for every inch of vertical rise, you need 12 inches (one foot) of ramp length. For example, if your porch is 20 inches off the ground, your ramp needs to be at least 20 feet long. While homeowners aren’t strictly bound by ADA rules in all jurisdictions, following this guideline is strongly recommended for safety and ease of use.
Do I Need a Building Permit to Build a Ramp?
In most municipalities, yes, you will need a building permit. Ramps are considered structural additions to your home and must meet specific safety codes regarding slope, width, handrail height, and footing depth. Always check with your local building department before starting construction. Failing to get a permit can result in fines or being forced to tear down your work if it doesn’t meet code.
What Is the Best Material for a Wheelchair Ramp Surface?
Pressure-treated lumber is the most common and affordable choice for the structure, but the surface requires traction. Composite decking is an excellent low-maintenance alternative that often comes with a textured grain for grip. Aluminum is another option, primarily for modular kits, as it is durable and naturally non-slip. If using wood, adding grit paint or non-slip adhesive strips is essential to prevent slipping when wet.
How Wide Should a Residential Handicap Ramp Be?
For residential use, a ramp should be at least 36 inches wide between the handrails. This provides enough space for a standard wheelchair to pass comfortably. However, a width of 42 or 48 inches is often preferred if space allows, as it offers more room for maneuvering and makes it easier for a caregiver to walk alongside the wheelchair user without feeling crowded.
Can I Build a Portable Ramp Instead of a Permanent One?
Portable ramps are suitable for very short rises, such as a single step or a threshold, and are typically made of aluminum. However, for a porch that is significantly higher than ground level, a portable ramp is not safe or practical. They lack the necessary handrails, stability, and proper slope for larger elevations. A permanent wood or concrete ramp is the only safe solution for accessing a typical porch height.
Conclusion
Undertaking the construction of a wheelchair ramp is a significant project, but it is one of the most rewarding home improvements you can make. It transforms a barrier into a gateway, offering independence and safety to those who need it most. By adhering to the 1:12 slope rule, securing the proper permits, and focusing on stability and traction, you ensure that your addition is not only functional but also compliant with safety standards.
Remember that attention to detail—from the depth of the post holes to the grit of the final finish—is what separates a makeshift fix from a lasting solution. Now that you have a comprehensive understanding of how to build a handicap ramp for a porch, you are equipped to enhance your home’s accessibility and welcome everyone with ease.

About
Jovie Mathews is a backyard and outdoor expert writer with over 12 years of hands-on experience transforming neglected outdoor spaces into thriving gardens and functional retreats. Raised in a family where weekends meant digging in the soil and building raised beds from scratch, Jovie developed a genuine love for the outdoors long before it became a career.
She writes with a practical, no-fluff approach — always testing ideas in her own backyard before sharing them with readers. From composting systems and native plant selection to patio design and pest control, Jovie covers the full spectrum of backyard life with equal parts expertise and enthusiasm.
Education
B.Sc. in Horticulture Science
University of Florida (UF) · Gainesville, FL · 2014
IFAS College of Agricultural and Life Sciences
Minor in Environmental Studies
University of Florida (UF) · Gainesville, FL · 2014
College of Liberal Arts and Sciences
Areas of expertise
- Lawn & Garden Care
- Soil prep, planting, seasonal care
- Outdoor DIY Projects
- Raised beds, fencing, pathways
- Composting & Soil Health
- Organic methods, amendments
- Native Plants & Wildlife
- Pollinators, habitat gardening
When she is not writing, Jovie can be found testing new composting techniques, growing tomatoes in questionable quantities, or convincing her neighbors that clover lawns are actually a great idea. She currently gardens in the Pacific Northwest.