As winter approaches, the temperature drop brings a serious risk to your home irrigation setup. Water left lingering in your pipes can freeze, expand, and cause significant damage to valves, pipes, and sprinkler heads. Preparing your garden for the cold season is about more than just raking leaves; it requires protecting your investment in your landscape. Many homeowners feel intimidated by the maze of valves and piping, but the process is manageable with the right guidance.

Taking the time to winterize your irrigation setup can save you hundreds of dollars in repair costs come springtime. By following a clear process, you can ensure your equipment survives the freezing months intact. In this guide, we will walk you through the essential steps on how to drain sprinkler system components safely and effectively, ensuring your garden is ready to bloom again when the weather warms up.
Draining Your Sprinkler System is Important
Understanding the necessity of draining your irrigation system goes beyond simple maintenance; it is a critical protective measure for your property. When water freezes, it expands with significant force. In the confined space of a PVC pipe or a brass valve, this expansion has nowhere to go but outward, leading to cracks, bursts, and shattered components. A single frozen manifold or backflow preventer can cost hundreds of dollars to replace, not to mention the labor costs involved in digging up your yard to fix underground breaks.
8 Step Methods Guide on How to Drain Sprinkler System
Step 1: Locate and Shut Off the Main Water Supply
The very first step in the winterization process is to cut off the source of water flowing into your irrigation lines. You must locate the main shut-off valve for your sprinkler system, which is typically found in the basement, a utility room, or a crawl space near where your main water line enters the house. In some cases, this valve might be located outside in a dedicated valve box or near the water meter.
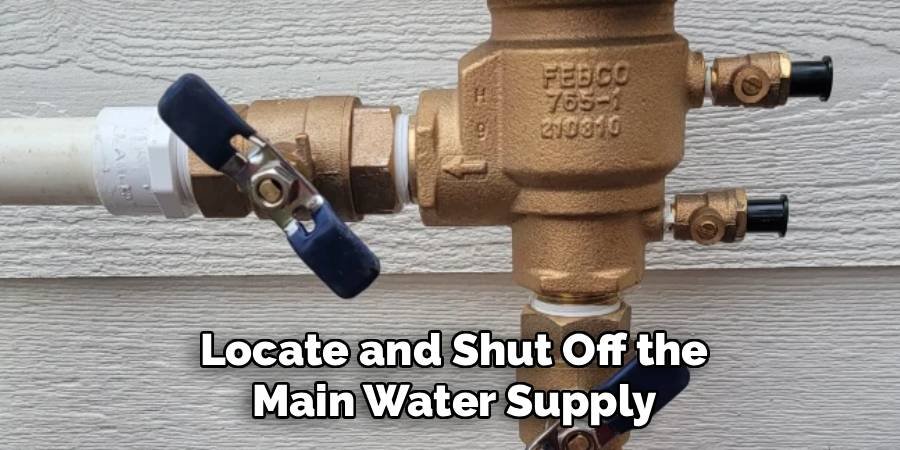
It is crucial to ensure this valve is turned completely to the “off” position so no new water can enter the pipes while you work. If the valve is a ball valve, the handle should be perpendicular to the pipe. If it is a gate valve (a round handle), turn it clockwise until it stops. This prevents accidental flooding and allows the remaining water to drain out without being replenished by the main supply.
Step 2: Power Down the Irrigation Controller
Once the water is off, you need to address the “brain” of your system: the controller or timer. Most modern controllers have a specific “Off” or “Rain Mode” setting designed for this purpose. It is generally better to set the system to “Rain Mode” or “Off” rather than unplugging it entirely. This approach keeps your programmed settings, date, and time saved in the device’s memory, so you do not have to reprogram everything from scratch in the spring.
The controller will continue to keep time but will stop sending electrical signals to the valves to open. If you have a smart controller connected to Wi-Fi, you can likely suspend the schedule through your smartphone app. Ensuring the electrical components are in a dormant state prevents the solenoids from trying to activate valves when there is no water, which can sometimes cause unnecessary wear or humming noises from the equipment.
Step 3: Locate and Open Manual Drain Valves
Now begins the physical work of removing water from the lines. You need to find the manual drain valves, which are typically located at the lowest points and the ends of your piping layout. These valves are installed specifically to let gravity do the work of emptying the pipes.
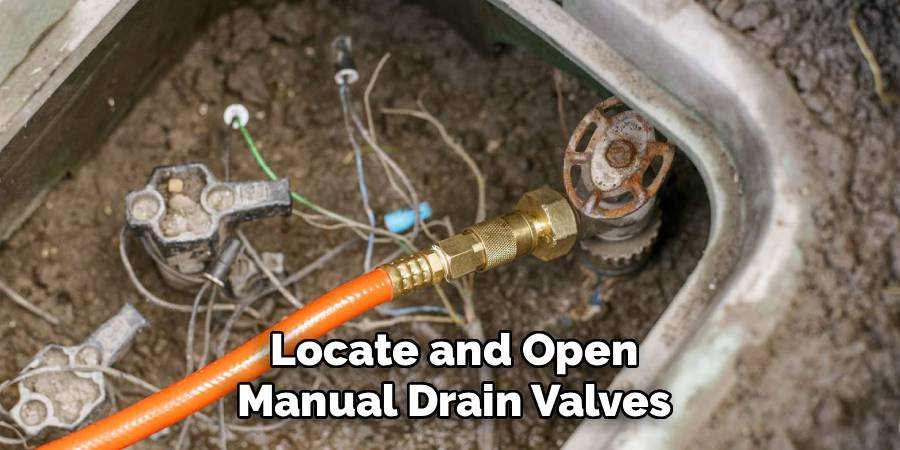
Look for these valves in valve boxes buried in your yard or sometimes near the sprinkler heads themselves at the end of a zone. Once located, open each drain valve slowly. You should see water beginning to flow out into the surrounding gravel or soil. Be sure to wear protective gloves, as valve boxes can sometimes be home to spiders or bugs. If your system was designed correctly with gravity in mind, a significant amount of the water sitting in the lateral lines will exit through these points.
Step 4: Drain the Backflow Preventer Device
The backflow preventer is one of the most expensive and fragile parts of your irrigation setup, making it a priority during winterization. This device prevents contaminated water from flowing back into your drinking water supply, and it sits above ground where it is most vulnerable to freezing wind. On most backflow preventers, you will find two main shut-off handles.
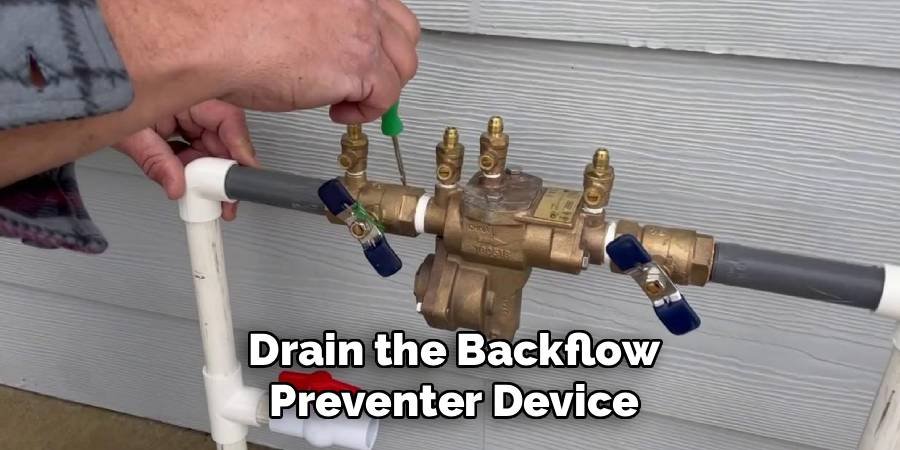
You typically want to turn these to a 45-degree angle—halfway between open and closed. This specific position prevents water from being trapped in the ball mechanism itself, which can crack the brass body if it freezes. While you are addressing the backflow device, this is a key moment to remember that learning how to drain sprinkler system gear correctly involves attention to these small details that prevent cracking.
Step 5: Open the Test Cocks on the Backflow Device
On the side of your backflow preventer, you will see smaller outlets known as test cocks. These look like small screws or mini-valves and are used by professionals to test the pressure of the system. For winterization, you need to open all of these test cocks to ensure every last drop of water trapped in the device can escape.
You will likely need a flathead screwdriver to turn them a quarter turn. When you open them, a small amount of water may spurt out, which is a good sign. Leave these test cocks open for the duration of the winter. This ensures that air can circulate and that no pressure builds up inside the metal casing. If you leave them closed, a small pocket of water can remain, freeze, and split the brass casing open, rendering the device useless.
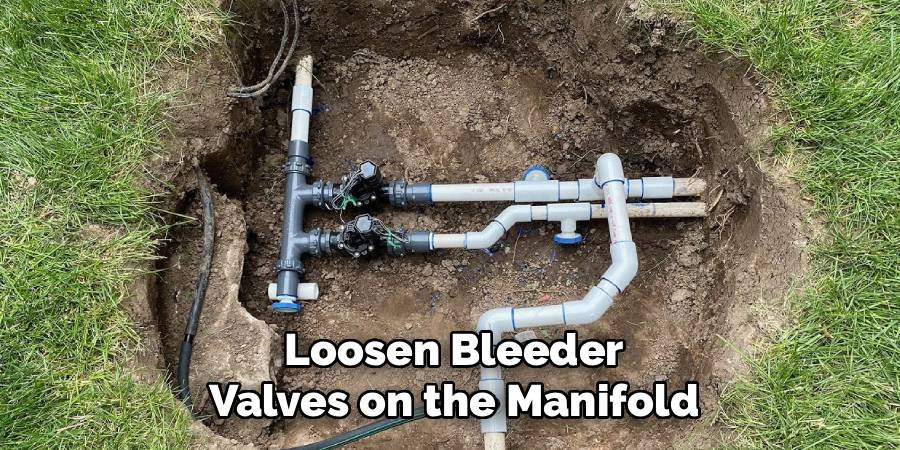
Step 6: Loosen Bleeder Valves on the Manifold
Locate the manifold, which is the hub where your main line splits into the various zone valves. This is usually found in a large green box buried in the ground. Each zone valve often has a small screw or knob called a bleeder valve or flow control. You should manually open each zone valve to release any water trapped between the main line and the zone lines.
You can do this by turning the solenoid (the cylinder with wires) a quarter turn or by loosening the bleeder screw. This releases the internal pressure and allows water to flow out of the valve and down toward the manual drains you opened earlier. Be gentle with these plastic components; they can be brittle. Opening these valves ensures that no water is trapped inside the diaphragm of the valve, which is a common failure point during hard freezes.
Step 7: Check and Drain Low-Point Sprinkler Heads
Even after opening drain valves, some water might remain in the sprinkler heads themselves, especially if the yard is uneven. Inspect your lawn for heads that sit in depressions or low spots. You may need to physically pull up the pop-up riser on these heads to let water drain out.
For systems without dedicated drain valves, some homeowners use a wet/dry shop vac to suck water out from these low points, though gravity usually does the trick if the system design is sound. If you have “check valves” installed in your heads (which prevent low-head drainage), they hold water in the lateral pipes. In this scenario, understanding how to drain sprinkler system lines might require you to loosen the head from the riser slightly to break the seal and let the water escape into the soil.
Step 8: Insulate Above-Ground Components
The final step in your manual draining process is to provide external protection for any components that remain above ground. The main shut-off valve, the backflow preventer, and any exposed piping need insulation. You can use foam insulation tape to wrap the pipes and a specialized insulated cover or “fake rock” for the backflow preventer.
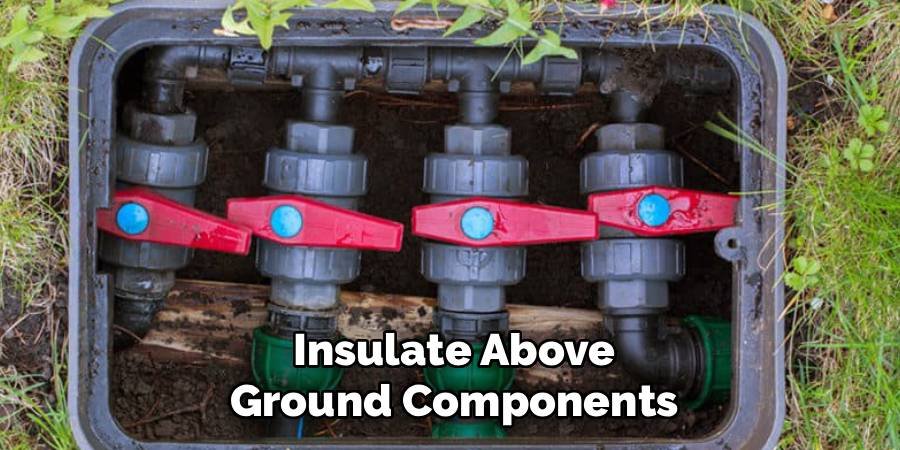
Even though you have drained the water, the metal components can still get extremely cold and brittle. Insulation provides a buffer against the harshest winds and temperature dips. Old blankets or towels wrapped in plastic bags can work in a pinch, but purpose-made insulation is best. Secure everything with duct tape or zip ties to ensure the wind doesn’t blow your insulation away. Once insulated, your system is officially ready to hibernate until spring.
Frequently Asked Questions
When Is the Best Time to Drain My System?
You should aim to drain your sprinkler system in late autumn, well before the first hard freeze of the season hits your region. For many climates, this means completing the task between October and early November. Waiting until the temperature drops below 32°F (0°C) overnight risks immediate damage to exposed pipes and backflow preventers. Watch the weather forecast closely and act as soon as the grass goes dormant.
Do I Need an Air Compressor to Drain My Sprinklers?
Not always, but it is the most effective method for completely removing water. The steps above outline a “manual drain” method, which works well for systems designed with gravity drains. However, if your pipes loop up and down without low-point drains, a manual drain might leave water behind. In those cases, using an air compressor (the “blow-out” method) is safer to ensure lines are empty.
What Happens If I Forget to Drain the System?
Failing to drain the system usually results in “freeze breaks.” Water trapped in the pipes turns to ice and expands, causing PVC pipes to shatter and brass fittings to crack. The most common casualties are the expensive backflow preventer and the manifold valves. Repairs can be costly and labor-intensive, often requiring excavation of your lawn to reach the broken underground sections.
Can I Just Turn Off the Water and Leave It?
Simply turning off the water is not enough. Water remains trapped in the pipes and valves even after the supply is cut. Without opening the drains or blowing , that trapped water is a sitting duck for freezing temperatures. You must release the pressure and create an exit path for the water to prevent the system from bursting during winter.
How Much Does Professional Winterization Cost?
Hiring a professional to winterize your system typically costs between $75 and $150, depending on the size of your property and the number of zones. Professionals use high-volume air compressors to blow out every drop of water, offering a guarantee that your system won’t freeze. For many homeowners, this small annual fee is worth the peace of mind compared to the potential cost of repairs.
Conclusion
Taking care of your garden requires foresight, and winterizing your irrigation equipment is a vital part of that responsibility. By following these steps, you protect your home from water damage and save yourself from the headache of expensive spring repairs. It is a straightforward afternoon task that extends the life of your equipment significantly. Now that you know how to drain sprinkler system pipes and valves properly, you can rest easy this winter knowing your garden infrastructure is safe and secure.
About
Jovie Mathews is a backyard and outdoor expert writer with over 12 years of hands-on experience transforming neglected outdoor spaces into thriving gardens and functional retreats. Raised in a family where weekends meant digging in the soil and building raised beds from scratch, Jovie developed a genuine love for the outdoors long before it became a career.
She writes with a practical, no-fluff approach — always testing ideas in her own backyard before sharing them with readers. From composting systems and native plant selection to patio design and pest control, Jovie covers the full spectrum of backyard life with equal parts expertise and enthusiasm.
Education
B.Sc. in Horticulture Science
University of Florida (UF) · Gainesville, FL · 2014
IFAS College of Agricultural and Life Sciences
Minor in Environmental Studies
University of Florida (UF) · Gainesville, FL · 2014
College of Liberal Arts and Sciences
Areas of expertise
- Lawn & Garden Care
- Soil prep, planting, seasonal care
- Outdoor DIY Projects
- Raised beds, fencing, pathways
- Composting & Soil Health
- Organic methods, amendments
- Native Plants & Wildlife
- Pollinators, habitat gardening
When she is not writing, Jovie can be found testing new composting techniques, growing tomatoes in questionable quantities, or convincing her neighbors that clover lawns are actually a great idea. She currently gardens in the Pacific Northwest.