

Wicker furniture adds a timeless, rustic charm to any garden or patio, inviting you to relax in nature’s embrace. However, exposure to the elements can eventually take a toll, leaving you with unraveled strands, broken seats, or faded finishes. Before you drag that beloved chair to the curb, you should know that restoration is easier than you think. Learning how to fix wicker patio furniture can save you hundreds of dollars and extend the life of your outdoor set by years.

This guide is designed for complete beginners who want to tackle repairs themselves. Whether you are dealing with natural rattan or modern synthetic resin, the process is straightforward and rewarding. We will walk you through everything you need to know to bring your favorite garden pieces back to life, ensuring your outdoor sanctuary looks welcoming and pristine for the coming season.
Restoring Wicker Is Worth Your Time
Repairing your existing furniture is almost always a better option than buying new, both for your wallet and the environment. High-quality wicker furniture is an investment, and often the structural frame remains perfectly sound even when the weaving starts to deteriorate. By addressing these minor cosmetic and structural issues early, you prevent further unraveling that could render the piece unusable.
Furthermore, there is a deep sense of satisfaction that comes from manual restoration. As a home gardener, you already understand the value of nurturing things to life. Applying that same care to your patio set allows you to preserve the sentimental value of your furniture while customizing the finish to match your current garden aesthetic. It is a sustainable choice that reduces waste and keeps durable materials out of landfills.
8 Step-by-Step Guide on How to Fix Wicker Patio Furniture
Step 1: Clean the Furniture Thoroughly
Before you begin any actual repairs, you must ensure the entire piece is free from dust, grime, and mildew. Over time, outdoor furniture accumulates a layer of dirt that can hide the true extent of the damage and prevent adhesives from bonding correctly. Start by using a vacuum with a brush attachment to remove loose debris from the crevices of the weave.
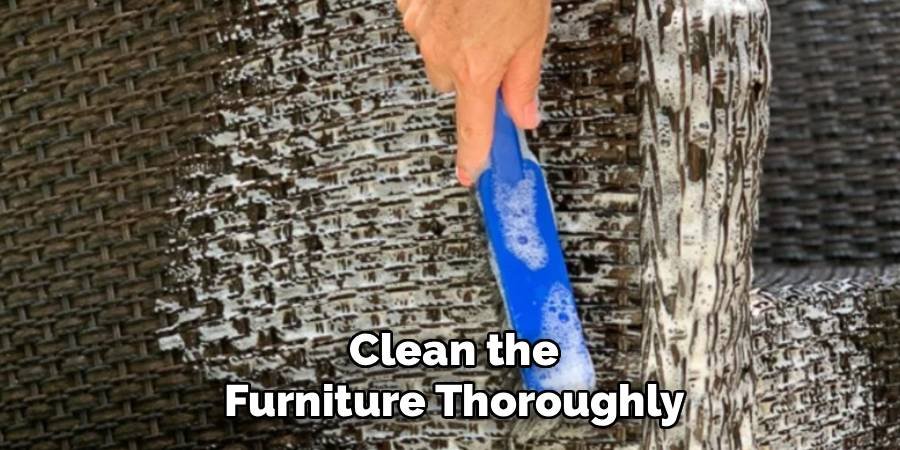
Follow this by scrubbing the furniture with a mixture of mild detergent and warm water using a soft-bristle brush. Rinse it gently with a hose and allow the piece to dry completely in a shaded, breezy area. Working on a clean surface is essential for identifying every broken strand that needs attention.
Step 2: Assess the Damage and Identify Materials
Once your furniture is clean and dry, take time to closely inspect every inch of the weaving. You need to distinguish between natural materials like rattan, reed, or bamboo, and synthetic resin or vinyl, as this dictates how you proceed. Look for specific issues such as loose wrappings on the legs, snapped weavers on the seat, or structural breaks in the frame. Mark the damaged areas with a small piece of painter’s tape so you do not miss anything during the repair process. If you are dealing with natural wicker, check for dryness and brittleness, which indicates the material needs hydration before you can work with it effectively without causing further breakage.
Step 3: Source and Prepare Replacement Strands
If you have missing or broken strands, you will need to purchase matching repair material. You can often find repair kits at craft stores or online specialty retailers that match the width and style of your weave. If you are working with natural wicker, preparation is critical. You must soak the new strands in warm water for roughly 30 to 45 minutes before using them. This process makes the reed flexible and pliable, allowing you to weave it tightly without it snapping. Synthetic materials do not require soaking, but you should ensure they are warm enough to be flexible; working in a sunny spot usually helps soften the plastic slightly for easier manipulation.
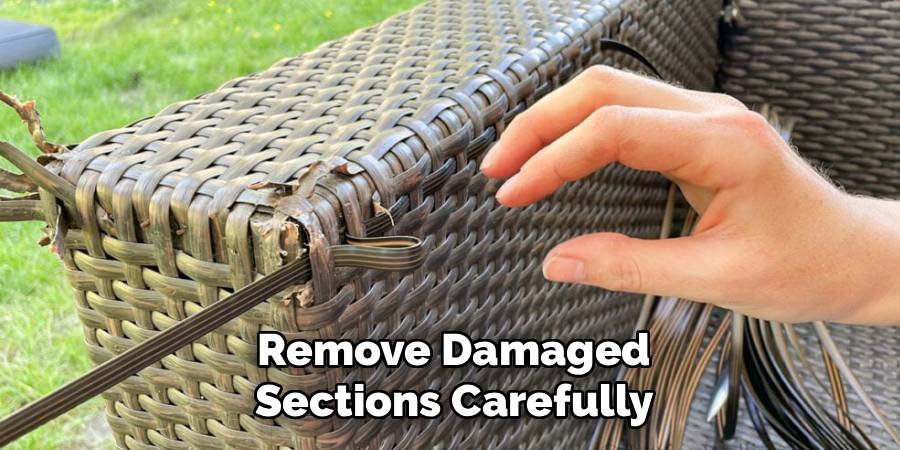
Step 4: Remove Damaged Sections Carefully
Using a pair of sharp needle-nose pliers or scissors, carefully cut away the damaged sections of the weave. You want to trim the broken strand back to a point where the weave is still tight and secure, usually near the frame or under a cross-weave. Be extremely gentle during this step to avoid damaging the surrounding healthy strands or scratching the furniture frame. If the strand is just loose and not broken, you might not need to cut it at all. However, for snapped pieces, ensure you leave a small tail on the existing healthy strand, which will help you tuck and anchor the new piece securely later in the process.
Step 5: Begin Weaving the Replacement Strands
Take your prepared replacement strand and apply a small dab of wood glue (for natural wicker) or strong adhesive (for synthetic) to one end. Tuck this end firmly into the weave where you trimmed the old strand, ensuring it is anchored underneath an intersecting piece. Once the anchor is secure, begin weaving the new strand according to the original pattern. This usually involves an over-under motion that mimics the existing design. Keep the tension tight as you go. If you are learning how to fix wicker patio furniture, patience during this weaving phase is the most important tool you have. Pull the strand taut after every pass to ensure the repair blends seamlessly with the surrounding area.
Step 6: Tighten and Secure the Weave Pattern
As you progress with the weaving, you may notice that the new strands settle differently than the old ones. Use a small tool, like a flat-head screwdriver or an awl, to gently push the rows of weaving together. This compacting process ensures there are no unsightly gaps and that the structure remains supportive. If you are repairing a seat or a weight-bearing area, this tightness is crucial for safety. Continue the over-under pattern until you have covered the damaged area completely. Double-check your work against the original pattern frequently to ensure you haven’t skipped a row or altered the design, which would make the repair obvious visually.
Step 7: Anchor and Glue the Final Ends
When you reach the end of the damaged section, you need to secure the new strand so it never unravels again. Cut the replacement strand, leaving just enough length to tuck the end under an existing cross-strand. Apply a generous amount of adhesive to the end of the strand and use your needle-nose pliers to force it into the tight spot under the weave. Press down firmly to ensure contact. For natural wicker, the material will shrink slightly as it dries, which naturally tightens the bond, but the glue provides essential insurance. Wipe away any excess glue immediately with a damp cloth to keep the finish clean and professional.

Step 8: Apply Finish to Blend the Repair
After the glue has dried completely, you will likely notice a color difference between the new strands and the weathered original furniture. To fix this, you need to stain or paint the repair area. If you possess natural wicker, use an oil-based wood stain that matches your furniture’s color. Apply it with a small brush, feathering it out into the surrounding area to create a gradual blend. For painted or synthetic wicker, spray paint specifically designed for plastic or outdoor furniture works best. Apply light, even coats to avoid drips. This step acts as camouflage, making your hard work invisible and giving the entire piece a uniform, refreshed appearance.
Seal and Protect for Longevity
The final step in your restoration journey is protecting your hard work from future weather damage. For natural wicker, apply a coat of clear marine varnish or boiled linseed oil. This restores moisture to the fibers and creates a barrier against rain and UV rays. If you have painted the furniture, a clear topcoat spray can add an extra layer of durability. Allow the furniture to cure in a dry, well-ventilated area for at least 48 hours before using it. This curing time ensures that all adhesives and finishes have hardened completely. Once dry, your patio set is ready to withstand the elements and provide comfort for many seasons to come.

Frequently Asked Questions
Can I Repair Synthetic Resin Wicker?
Yes, you can easily repair synthetic resin wicker. The process is very similar to natural wicker, but you will need to buy resin repair strips instead of reed. Because synthetic material does not shrink like natural wood, you must use a strong cyanoacrylate adhesive (super glue) or a specialized plastic bonding epoxy to secure the ends. Heating the strands with a hair dryer can make them more pliable and easier to weave.
How Long Does Natural Wicker Need to Dry?
After you have completed the repairs, including soaking the reeds and applying glue, natural wicker typically needs about 24 to 48 hours to dry completely. As the wet reeds dry, they will shrink slightly, which tightens the weave and secures the furniture’s structure. Do not sit on or use the furniture while it is damp, as this can cause the new strands to stretch out and sag, ruining your repair work.
What is the Best Glue for Wicker Repair?
The best glue depends on the material you are fixing. For natural wicker, high-quality exterior wood glue (like PVA glue) is the standard choice because it creates a strong bond that absorbs into the fibers. For synthetic or resin wicker, wood glue will not work. Instead, opt for a clear, heavy-duty super glue or an epoxy specifically formulated for plastics. Always clean excess glue immediately to prevent unsightly residues.
Can I Paint Wicker Furniture with a Brush?
While you can use a brush, spray paint is generally the superior method for wicker furniture. Wicker has hundreds of tiny crevices and overlapping strands that are nearly impossible to reach with a standard paintbrush without causing drips or missing spots. Using spray paint allows you to apply thin, even coats that penetrate deep into the weave from multiple angles. It provides a smoother, factory-like finish in significantly less time.

How Can I Prevent Wicker from Breaking in the Future?
To prevent future breakage, keep your wicker furniture clean and moisturized. For natural wicker, wipe it down occasionally with a damp cloth to prevent the fibers from drying out and becoming brittle. Keep furniture covered when not in use, especially during harsh weather or intense sunlight. Bringing wicker indoors during freezing winter months is also highly recommended, as freezing temperatures can cause both natural and synthetic strands to crack and snap.
Conclusion
Restoring your garden furniture is a rewarding project that breathes new life into your outdoor space. By following these steps, you have saved a cherished piece from the landfill and created a sturdy, beautiful seat for your morning coffee. Remember that regular maintenance, such as cleaning and covering your furniture, will protect your hard work. Now that you know how to fix wicker patio furniture, you can confidently tackle any loose strand or broken weave that comes your way. Grab your pliers and glue, and get ready to enjoy your patio all over again

About
Jovie Mathews is a backyard and outdoor expert writer with over 12 years of hands-on experience transforming neglected outdoor spaces into thriving gardens and functional retreats. Raised in a family where weekends meant digging in the soil and building raised beds from scratch, Jovie developed a genuine love for the outdoors long before it became a career.
She writes with a practical, no-fluff approach — always testing ideas in her own backyard before sharing them with readers. From composting systems and native plant selection to patio design and pest control, Jovie covers the full spectrum of backyard life with equal parts expertise and enthusiasm.
Education
B.Sc. in Horticulture Science
University of Florida (UF) · Gainesville, FL · 2014
IFAS College of Agricultural and Life Sciences
Minor in Environmental Studies
University of Florida (UF) · Gainesville, FL · 2014
College of Liberal Arts and Sciences
Areas of expertise
- Lawn & Garden Care
- Soil prep, planting, seasonal care
- Outdoor DIY Projects
- Raised beds, fencing, pathways
- Composting & Soil Health
- Organic methods, amendments
- Native Plants & Wildlife
- Pollinators, habitat gardening
When she is not writing, Jovie can be found testing new composting techniques, growing tomatoes in questionable quantities, or convincing her neighbors that clover lawns are actually a great idea. She currently gardens in the Pacific Northwest.




